Member Security
By default, all roles assigned to the data model can see all members of a hierarchy.
- Enable: Once a role is enabled for a specified member, it is also disabled for all other members; the role will only have access whichever members have been manually enabled.
- Disable: However, when a role is disabled for a selected member, the role remains enabled for all other members; the role will have access to all members in the data model, except those that for which it has been manually disabled.
Row Level Security
Since member level security controls a fine grain of selection with dimensions, it is sometimes referred to as "row level" security, because it allows developers to effectively control each row of data presented to end users. This is different to column level security, which allows admins to block off access to an entire column / attribute (and by extension entire tables / dimensions).
With Parent-Child hierarchies, the concept of row-level security is enhanced to handle hierarchical structures, since the hierarchy itself cannot be deconstructed to a simple column level operation. This includes options for "Visual Totals" based on visible elements. See below for more.
How to set Member Security
There are two ways to define member security:
- Basic: select the role, hierarchy, and then member elements that should be enabled or disabled for the selected role.
- Script: select the role and hierarchy, then build a custom set in the Security Script editor. Click here to learn more about scripted security logic to create "dynamic" security.
Basic Member Security
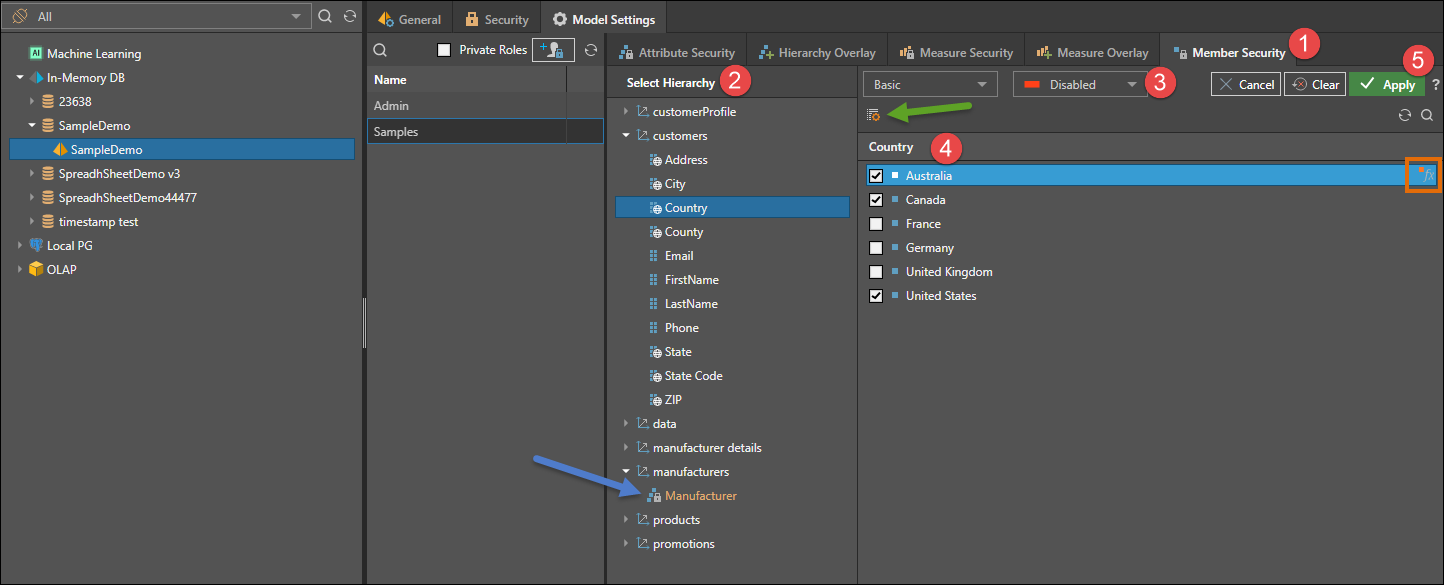
- With the relevant data model and user role selected, open the Member Security panel.
- From the Select Hierarchy panel, choose the hierarchy for which you want to configure member security.
- Choose whether to enable or disable the chosen member elements.
- Select the member elements for which you want to set security.
- You can choose multiple members, and you can use the List Builder (green arrow) to import a list of members (rather then manually selecting them).
- You can configure Functional Selections on given member element by hovering over it and clicking the Fx icon (orange highlight).
- Click Apply to save changes.
- To continue setting member security for the selected role, repeat steps 2 - 5.
- Hierarchies for which member security has been set will be displayed in orange font with a padlock icon (blue arrow).
In the example below, the members Australia and Canada, and United States within the Country hierarchy are disabled for the Samples role. Because of the relationships in the database, all geospatial locations within the United States will automatically be disabled for EMEA as well:

Parent Child Hierarchy Security
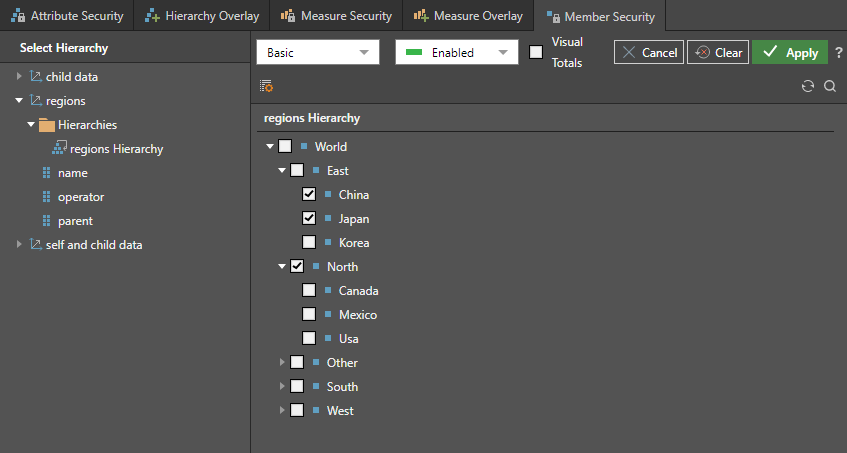
Member security can be set for parent child hierarchies. Open the hierarchy and select each level that you want to secure. Unlike flat attributes and regular hierarchies, security for parent-child hierarchies can be configured to allow users to see parent elements WITHOUT needing to see its child elements. This offers various permutations on content security that often matches applications for parent-child hierarchies. For instance: all managers can see the performance of all regions within the company, but each manager can only see the details of performance within the region. It should be noted that when you select a child element, it's parent (and ancestors) are always visible.
In the example below, the following items will be visible in the query: World, East, China, Japan, and North.
Visual Totals
Enable visual totals to display values for the elements in the query according to the enabled levels, rather than the actual value. For instance, in the example above, without visuals totals, World and East will both display the total of all their children, including those that are not enabled. If visual totals is enabled, World will display the total of China, Japan, and North; East will display the total of China and Japan only.
Scripting Security
Since the member security in parent-child hierarchies is usually fluid, most implementations deploy security via a script, rather than point-and-click selections (as shown above).
- Click here to see security scripts in action.
